Whether you’re a newbie interested in mobile app design or an entrepreneur seeking business app solutions, sit back and relax, because this guide is all you need!
But let’s give you a little heads up first.
Did you know that the average smartphone user spends 2 hours and 54 minutes on their phone every day? Guess what they’re using for most of that time? Yep, you guessed it: mobile apps!
But with millions of apps out there, why should users choose your app over the competition?
It’s down to many factors, but one of the most important is mobile app design.
So, without further ado, let’s begin with the basics.
💡 What is Mobile App Design?
Mobile app design broadly refers to 2 aspects of your mobile application.
The first one is user interface (UI), which focuses on the look and style of your mobile application. Here, the aim is to design an interface that users find convenient and pleasing to the eye.
The other aspect is user experience (UX), which focuses on how the user interacts with the mobile application. Here, the aim is to provide ease of use, efficiency in performing tasks, and clarity to the app user.
But Do I Really Need a Good Mobile App Design? 😕
Of course. In fact, it’s something that could make or break your app! Don’t make the mistake of underestimating the importance of a great mobile app design.
Here’s Why You Need a Good Mobile App Design

For starters, an excellent mobile application is one that offers a great user interface (UI) and user experience (UX). These two aspects set your application apart from an ocean of applications.
And FYI, did you know that until 2020, iOS was home to over 1.85 million apps? Android had even more with 2.56 Million!
Here’s another shocker, the Google Play Store records an addition of 6,140 applications to its store each day! The App Store sees an increase of 965 mobile applications on average daily. That’s almost a thousand new apps each day!
Just imagine how hard it is for mobile applications to stir users’ interest. With so many apps being added to an already huge bulk, it’s easy for your application to get lost in the crowd. Therefore, your application needs to stand out.
People tend to keep apps they use frequently or really love; otherwise, they will delete them. If they don’t have a great user experience, they might even leave a bad review, and we all know that too many bad reviews can affect your mobile application’s success.
This is why a good mobile application design is crucial. It has to be visually attractive, user-friendly, and offer the right functionality to be trusted and retained by the end-user.
✨ A Fun fact
Tech giants like Apple spend about 60% of their project time on the design phase; hence, the importance of mobile application design can’t be understated.
🧠 Evaluating the Design of Your Mobile Application

So you have an app idea, but how do you go about designing your mobile application?
Before you approach a designer or take the uphill task yourself, you must evaluate your mobile app design and strategy. Here’s what you must do:
- Determine the scope
- Carry out in-depth user and market research
- Create a UX wireframe
📜Determine the Scope
This is the first step in your evaluation process. Design a framework in which you decide your app objectives, your expectations from the app, and your app size: large or small.
Your scope must cover the following:
- The nature of your app
- Your target audience
- Important functions and features of your app
- An idea of the visual aspects of your app
- Potential technologies your app will utilize
- How aligned the app is with your business strategy
- Specific app preferences
When you finalize the scope of your app, it’s vital to ascertain:
- Aims and goals of the app
- Tasks and resources
- Budget allocation
- Timeframe
Interested in developing your own mobile app but don’t have the time? Check out our mobile app design services.
These are very important because they set the direction and design flow of your mobile application.
🕵️ Carry Out In-Depth User and Market Research
Better put on your detective hat for this stage, as it involves in-depth market research.
It’s best to base your market and user research on the scope determined earlier and on your app strategy.
The goal here is to find the best UX design that makes your mobile application unique in a sea of similar apps.
How to get started
You must analyze existing apps in your industry. For instance, if you plan to create an e-commerce app, you’ll have to check out existing e-commerce apps, color schemes, build patterns, functionality, flow, etc.
Your user research should reveal to you colors and themes that help you develop an emotional connection with your target audience.
Think like a user here. What colors and styles would appeal to them?
You can utilize different methods to collect data from potential users, such as surveys, questionnaires, focus groups, etc.
Remember, good research goes a long way!
🖌️ Creating a UX Wireframe

A UX wireframe is how your application’s user interface (UI) should look. Here, you create a basic structure of your UI, transitions, and interaction points.
Base them on your user and market research, competitor analysis, and application strategy.
The beauty of a UX wireframe is that a designer can either create it on software or go old school and draw it on a piece of paper.
Remember, you’re laying a user flow as you want it to appear on the app. Simple is better.
Your UX wireframe’s purpose is defining the flow of the app. This includes the number of windows, buttons, layout, the logic of each button, login screen, etc.
In a nutshell, everything that makes the user experience convenient.
The Actual 6 Step Design Process for Mobile Application Design
The wait is finally over. Now we get to the fun part! After you’re done with the mobile app design evaluation, it’s time for the actual design process.
At TechNerds, we follow these 6 steps when designing and developing an application:
- Developing a prototype
- Designing user interface (UI)
- Adding interface animations
- Planning out your software architecture
- Developing the app
- Testing your app
🏊♂️ Let’s dive in headfirst.
👩🏽💻 Developing a Prototype

This is the time to see and get a feel of your app. You can do this by developing a prototype.
Since you have a UX wireframe, all you need to do is create a low-fidelity prototype. In other words, map out your basic app concepts.
No need to develop expensive prototypes. Instead, you could save your resources here and divert them to app features, functions, and coding.
At TechNerds, that’s exactly what we do. We focus on minimizing client costs wherever we can.
🎨 Designing User Interface (UI)
Next up is UI design.
Prototyping and UX wireframe are all about app functionality. UI is all about how your app appears!
In this stage, finalize how your concepts appear visually, how your color scheme looks, button styles, images to use, and animations—basically, everything dealing with how your app looks.
Take your time here. Test out several colors, skins, themes, and all your visual elements.
See what works. Don’t rush. Judge for yourself. Be creative!
📽️ Adding Interface Animation
After designing your UI, we enter the realm of the animator.
Here, you will design your interface animations. These are an integral part of your UI design process, so be sure to test various animations in real-time.
Animations set the tone for your app functionality, such as how an app screen changes, what gestures to employ, etc.
You can efficiently guide the user through the app, utilize motions to help users smoothly navigate between features, inform them of your screen elements, etc.
Animations should provide convenience to the user and must not solely focus on visual appeal.
📐 Planning Out Your Software Architecture

Now you’re at the most critical stage of your mobile application design process. Your sole focus here should be scaling your mobile application and making its usability and design better.
Here we improve the front-end and back-end processes of your application. This involves the whole group of designers, programmers, and managers working on improving software architecture.
At TechNerds, we engage in constructive meetings regarding frameworks, app phases, and design platforms to deliver an optimum software architecture.
Remember, the aim here is to develop viable solutions to technical, operational, business, end-user, and system requirements.
Read more: Software Architecture
The final stage is …
Developing the App
The time to code has arrived! Work your coding magic and start creating the app.
Make sure you get top coders here. Poor coding will drain your budget and give you an inferior product!
Also, focus on either an iOS or an Android platform to create the app. Don’t focus on both simultaneously.
🤔 Why should I do this?
Simple. Developing an app costs money. If you develop the app for both platforms simultaneously and the developers code poorly, it would be disastrous for your pocket!
We suggest that you develop for Android first as it is cheaper compared to iOS. It all depends on your budget.
We suggest you leave this bit to specialists.
At TechNerds, our expert developers ensure your mobile application never suffers from a dire fate. Our success rate is over 98%!
After you complete this step, most of your work is already done! It’s time for the final step: testing.
📝 Testing Your Application

It’s crucial to do some application testing after app development. You’ll see how the app performs against your expectations and what bugs you need to fix. It’s always best practice to take a thorough testing approach.
Here’s a checklist of the testing techniques you must do. We’ll be covering this in a separate dedicated blog, so no worries!
- Documentation testing
- Functional testing
- Usability testing
- UI (User Interface) testing
- Compatibility (Configuration) testing
- Performance testing
- Security testing
- Recovery testing
You should always outsource app testing. Never use your own developers or their partners to avoid bias and poor judgment.
💰 How Much Does It Cost to Develop an App?
Now that we’ve run you through the whole process, it’s natural for you to think about money.
If you’re wondering about how much it costs to create an app, you’re not alone. You’re also not alone in thinking that it’s expensive.
But it all depends on where you look. At TechNerds, we pride ourselves on providing the best rates and flexible pricing plans to our clients.
Still not convinced? Let’s make a comparison.
Mobile application development in a conventional technology firm:

Don’t grab your head just yet. As we said earlier, it all depends on where you look.
What if we told you that you could get your mobile app designed for literally a fraction of the cost? Don’t believe it? You better!
TechNerds’ affordable rates for mobile app design and development start at only $35 an hour!

Our clients don’t have to bear the brunt of high costs. We ensure the highest standards while making sure it’s light on your wallet!
Want a website that serves as a landing page for your mobile app? Check out our Website Development Services.
How Long Does It Take to Create an App?
This is a very logical question to have, but one not easy to answer because it depends on various factors.
Here’s a breakdown.
The length of any project depends on the resources you’ll be able to utilize, the scope of what you’re trying to develop, and how skilled your team is. Typically, it could take anywhere from 16 to 20 weeks for an app to be ready for an app store.
It doesn’t mean that our team hasn’t been quicker or hasn’t worked longer on an app; this is just the average time to build a quality app.
Just remember, if you want a fantastic app, it can’t happen in a single day.
At TechNerds, we focus only on delivering quality products and services. Every project carries the client’s expectations with it, and they can never be compromised.
Some Design Tips to Consider for Your Mobile App

By now, you should have your first app! But before you go, here are some essential tips for designing your mobile application.
Avoid Information Overload for the User
🗑️ Avoid the Clutter!
Clutter is your user’s enemy. Period.
You don’t want too many options to appear upfront for them because this makes your app just too complicated!
Always focus on providing the end-user with information that is absolutely necessary.
More often than not, going with minimal functionality is a great option. This means:
- Keeping your interface elements as few as possible
- Giving only need-to-know information to the user
- Progressively revealing information as the user interacts with different app elements
Poor designs are not just a problem on desktops. They’re even worse and apparent on mobile devices because of screen fragmentation. The key to stellar mobile app designs is to keep valued information and remove anything that makes no sense.
A cluttered user interface can be fixed by using the functional minimalism technique ie:
- Keep the content to the point.
- Minimize the number of interface elements. Minimal designs are easier to use.
👋 Reduce User’s Effort as Much as Possible
Minimize your user’s effort as much as possible. For instance, if a user has already entered their data once, find where that essential information can automatically be reused.
Don’t expect them to re-enter the same data again and again!
You can utilize your user’s previously recorded data with a smart default.
That will help your user spend more time on the app and make your mobile app’s user experience much better.
⚒️ Divide Lengthy Tasks into Smaller Sub-Tasks
If a task requires users to go through many steps in your app, divide such tasks into smaller sub-tasks.
This tactic dramatically reduces complexity for the user.
Give Users a Sense of Control

A task that requires many steps and actions from the user should be divided into a number of subtasks. This concept is extremely important in designing mobile apps since you don’t want to overwhelm the user journey with too much information at once.
For example, if you design an e-commerce app, your aim should be to make every action easy to do for the end-user. This division of tasks is most applicable when designing a checkout section or a complaint section.
You can break these sections into bite-sized chunks so that the users don’t feel intimidated by any form of process. Breaking every step and presenting it in block form makes the user feel in control.
It can also help link two activities together, i.e., connecting the checkout page with a shopping cart. It’s easier for a user to move forward in a flow when things are presented as logically connected blocks.
💾 Keep Things Familiar
Design your mobile app in such a way that the user can predict what each function will do. In other words, users should be able to see an element and easily understand its function. Make your interface elements intuitive.
Users tend to love apps they feel they have a command over, so give them that sense of control!
🔙 Prioritize Creating a Back Button that Actually Works
A great back button is the backbone of your app’s functionality. Remember, there are many ways to go forward, but only one way to go back!
Ensure the “back” button in a multi-step navigation process doesn’t directly take you back to the home screen. That wouldn’t be user-friendly.
🥂 Design A User-Friendly Interface

Cater to Every Type of Audience
Don’t forget all segments of your target audience. Remember, your audience includes people who might be visually impaired, color blind, or otherwise disabled.
Reduce User Input
Typing on a small mobile screen isn’t the most seamless experience. In fact, it’s often error-prone, and that mostly occurs when a user is asked to fill in a form. We are giving you a few recommendations to make this process easy:
Keep forms as short as possible by removing unnecessary fields. The app should only ask for the bare minimum of information from the user.
Provide input masks. It’s a technique that helps users format typed text. It formats the text automatically as the field is filled out, helping users focus on the required data and notice errors more easily.
Design keeping them in mind.
Keep your app accessible to people of all abilities and weaknesses. Research on users with visual impairment and other disabilities, learn their weaknesses, and design accordingly.
📱 Keep the Design Consistent

As designers, we know that consistency is a fundamental principle of design. However, keeping your app consistent can be tricky for numerous devices and screen sizes. For example, creating an interface that looks great on an iPhone and iPad can be a real challenge.
Here are a few tips for maintaining consistency across all devices:
Graphical Consistency
Use the same font, color, and size for buttons, icons, lists, and other essential elements. Using two different fonts for two different sections in your app will look unprofessional and confuse users.
Structural Consistency
Use the same type of navigation bar on all screens. However, if you’d like to have different colors or styles for each screen, you can achieve this by adding a new navigation controller to each view with its personalized style and title.
Niche Consistency
Mobile app design should be consistent with other products in the niche. For example, if your app is inspired by WhatsApp, it should have similar elements. This will eliminate the time it takes for users to become familiar with the app’s features.
Consistency With Website
If you have a website, make sure your mobile app complements its design and navigation. This will help your users enjoy a seamless experience with the mobile app.
For example, adapting to a different color scheme or altering the name of menu elements can confuse your users.
Follow the Platform Guidelines
Every mobile OS has its particular policies and guidelines for creators and users alike. If you’re developing a cross-platform app, you must follow the guidelines of each native platform so that your users don’t get scared away.
🌈 Be Aware Of Color-Blindness

Color blindness is one of the most common genetic disorders. It’s defined as the inability to perceive differences between some or all colors within the visible spectrum. This can be a significant issue for designers who believe their designs are clear and compelling, but they may not be visually understandable for everyone.
Color blindness affects 1 in 12 men and 1 in 200 women. That makes 4.5% of the global population color blind. It is also estimated that 4% of the world’s population suffers from low vision, while 0.6% are blind.
From this example, success or error notifications on websites or mobile apps are often signified by green and red colors, respectively. These two colors are the hardest for people with colorblindness to distinguish. Since they won’t be able to differentiate between colors, this can be frustrating for them.
As a recommended design practice, you should not rely only on colors as signifiers. Instead, use symbols such as a “cross” for errors and a “checkmark” for success.
At TechNerds, our designers keep W3C’s Guidelines in view when suggesting ideal color palettes for your mobile app to ensure everyone can use it interactively.
📍 Use Functional Animations To Clarify Navigational Transitions
There are many different ways to explain a state change on a page. The most common way is to use text, but when there is a lot of information needed or the change is not easily described with text alone, animations can be better suited for the task.
Animation can also be used to describe changes in layouts and interactions clearly. However, animations should not be used just because you can do it. Instead, they should always serve a purpose.
Animation does not need to be complex or lengthy to convey important information about how an interface works. Sometimes, even one simple animation frame can tell more than a thousand words of text. That’s why animations need to be concise and clear so users will understand them quickly and easily.
Don’t Overlap Navigation Patterns
Make sure the navigations you use in your mobile app are not overlapping, and the primary pattern of the app remains the same across the app.
For example, if one section of your app has sidebar navigation, make sure it remains consistent across the app.
👋 Be Careful with Using Gestures in the UI

Although using gestures in a mobile app makes it modern and appealing, you should be careful if you’re using them as a primary navigation option.
Why? Because gestures set a difficult learning curve for users.
When you use gestures, you expect users to discover them since they’re hidden and used as a secondary navigation option. And for your users to explore them, you need to educate them on how each gesture functions. Since each motion initiates an action on the app, it can sometimes be dangerous to use them without adequate knowledge.
Follow these simple rules while using gestures in a mobile app UI:
Use Gestures That Are Simple to Remember
Every mobile app in a specific industry has a few commonalities, and users are familiar with best practices. So, while you plan to use gestures in your mobile app, make sure you use standard ones only.
By “standard,” we mean those gestures that users widely recognize and don’t have to put in extra effort to find.
Include Gestures As a Secondary Option
Before including gestures in a mobile app, make sure they serve as a secondary option. Gestures fall in the “good to know” category; however, primary navigation controls fall in the “need to know” type.
For that reason, do not overlook even the faintest boundary between the good-to-know and the need-to-know categories to provide your users with a remarkable user experience.
💻 Make Animation Settings Flexible
Many people suffer from motion sickness.
Add the option of turning off animation in your app settings.
⭕ Load Content in the Visible Area of the Screen

The initial content users see on a mobile app screen must load faster and have enough information to consume. This approach helps users focus on the page’s main content without even noticing if the scrollable content is loaded yet or not.
While studies show it only takes 15 seconds for users to form an opinion, this is your chance to make a stellar first impression to grab their attention and convert.
👆🏻 Make It Clear When Loading Is Occurring
Apps perform differently under various circumstances. For example, sometimes users have to wait a long time to see what they want. This leads to frustration on their part, and they will leave your app.
To stop this, you can add a loading widget or a progress bar on the blank screen to let users know that the app is still working and is not frozen.
🦖 Offer a Visual Distraction

Take Google Chrome’s example: when you have poor or slow connectivity, the browser lets you play the Dino Run Game, keeping users interested even when they have to wait.
You can set up such a visual distraction to keep your users engaged with the app while they’re waiting for something to load. This can significantly increase the average time users spend on the app.
📲 Optimize Content for Mobile
Content plays a very significant role in the success of your app. Make sure your mobile app content is visible, not cluttered, and easily digestible for your audience.
🖊️ Make Text Readable and Clear
Put on the customer hat for a moment. Open your app and analyze if the content is readable or not. Even if the content is modern and crisp, the writing serves no purpose if it isn’t readable.
Read a few best practices on content readability:
- Avoid using all caps
While all caps are fine for writing acronyms/abbreviations, avoid writing in all caps if your content is lengthy and has different sections.
- Avoid writing lengthy paragraphs
Writing long paragraphs in your content can be boring and decrease readability. A good rule of thumb is to not exceed 40-50 characters per line while crafting mobile app content.
- Break paragraphs wisely
Use short paragraphs, and start a new paragraph when a different point is being made. Make sure there is space between paragraphs.. This practice will avoid overwhelming users with a lot of information.
Read a few best practices on content legibility:
- Font size
Use a font size of at least 16px. Anything smaller will disrupt the user experience.
- Font family
You may want to use a stylistic and modern font family to add a unique element to your app. Does this really work? Generally, no, because users prefer minimalistic and easy-to-read fonts. The best practice is to use system default fonts for each OS, i.e: San Francisco for iOS and Roboto for Play Store.
📸 Use High Quality And Optimized Images

With the advent of high-resolution screens, images are taken to a new level. Pixelated images on HD screens leave a poor impression on your users.
You should always ensure that your images appear in the correct aspect ratio to avoid distortion. For example, if an image is stretched too wide or too long to fill a space, it will appear unattractive and unacceptable.
🖼️ Video Content is Optimized for Portrait Mode
According to Hubspot, video content tops the list of favorite content types preferred by users. A message can be effectively conveyed without being confined to text boundaries.
Since 94% of users prefer to use their mobile devices in portrait mode, you must optimize the video content on your mobile app to allow users to watch it in portrait mode.
🧑🤝🧑 Feedback on Interaction
In the real world, whenever we make interactions with objects, they respond accordingly. Users expect a similar level of response on interactions while they engage with UI digital controls.
If your app requires users to sign up before using it, use a sound or vibration to complete the signup process. This will give users a feeling that the app stays with them all the time. You can channel this feedback on interaction throughout the app.
👨 Humanize the Digital Experience
Humanizing the digital experience is the new maxim in UX. We no longer want to feel like we’re interacting with a mobile app—we want to feel like we’re connecting with another human being. The best designers are empathetic and put themselves in their users’ shoes.
Personalized Experience

Personalization is perhaps an essential feature of any mobile application. It helps you tap your users’ interests and provide them with the information they want to get.
You have a lot of ways to offer personalized experiences to your users by tracking their activities, and interests, and then showing them suggestions that seem genuine to them.
For example, if your users are interested in purchasing laptops and computer accessories, you can send them notifications to help them with the purchase decision. However, you surely wouldn’t want to frustrate them by sending too many notifications at one time, so maintain a balance.
📝 Avoid Sending Many Notifications in a Short Time
Just because you can send personalized notifications to your users doesn’t mean you should do it all the time. It’s one of the core reasons users uninstall mobile apps, followed by a complex registration process.
So, be mindful of the timings of sending notifications to users. Too many of those will lead them to uninstall the app.
Time Your Notifications

You have something very important to share with your users, but sharing it during unsuitable hours will create little to no value. The best practice is to send notifications to your users during the highest mobile usage time, i.e., 6:00 pm–10:00 pm.
📳 Take Advantage of the Device’s Capabilities
Modern-day mobile devices are equipped with a lot of features and built-in sensors like cameras and location tracking. Use these features and sensors to your full advantage.
Here’s how:
- Camera
Instead of asking users to type in information like their credit card or driver’s license numbers, enable them to use the camera to capture cards. Your app will automatically read the numbers on it. It’s as simple as 1, 2, 3.
- Location tracking

Many apps require their users to turn on location tracking while using the app. Take UberEats, for example; the app requires its users to turn location services on to show them nearby restaurants.
So if you’re working on a similar app, add location detection to it so that users don’t have to put in their address every time they open it.
📺 Strive to Create a Multi-Channel Experience

When you create a user journey, you should think about the entire customer experience, not just about every individual channel. Your goal is to create an experience that is consistent across all channels.
A multi-channel experience means that your users can use any device to access your app and still be able to complete their tasks in the same way they would on their desktop or laptop. This creates a seamless user journey, allowing users to move between devices without barriers or confusion.
🗺️ Adapt Mobile Design to Emerging Markets
According to Google, 2021-2030 is the digital decade for South Asia. This is a very exciting time for mobile app creators to expand their horizons and take their apps to the world’s emerging markets. And South Asia, without a doubt, is the fastest-growing digital market, expected to reach $1 trillion by 2030.
Consider countries like India, Pakistan, Brazil, and Nigeria if you’re interested in expanding your global footprint.
☁️ Testing and Feedback
Until now, you have only explored the principles that can help you develop and design a great mobile app; however, you still need to do beta testing.
The best way to go about it is to create MVPs of your mobile app and ask real users to test it before launching it.
Feedback Loop

Because real people are using your app, only they can tell you what their experience is like and how it can be improved. However, this can only be made possible by taking regular feedback from them.
Therefore, encourage your users to give feedback at every level possible. It’s as simple as creating a comment section below a blog post.
🖌️ Design is a Never-Ending Process

Design is a never-ending process. There are many phases in the design process; it starts with the research. This involves talking to customers directly in order to get an understanding of what they need.
The next phase is coming up with ideas for improving the product. Prototyping comes next, essentially creating small tests of each idea to figure out which ones will work best and then building them into working products.
Finally, there’s testing and validation, where we evaluate whether or not the product works as it should. If there are any issues, we go back through the phases until everything works as intended. And the cycle keeps repeating.
Helpful Tools and Resources for Designers
- Color Contrast Checker

The number of mobile apps that fail to pass the AA test is staggering. We’re sure you don’t want to be one of them! Color contrast should always be checked for accessibility. You can use WebAIM Color Contrast Checker to test color combinations.
- UI Kits for Adobe XD
Adobe XD is an excellent tool for designing user interface elements. You can use it for prototyping and wireframing, but you can also create full-fledged layouts.
You probably know how important UI kits are if you are a designer. They make your work easier and faster since you can use them as a starting point or copy elements from them.
🧭 Keep Mobile App Navigation Simple
Navigation is one of the most critical aspects of an excellent mobile app design. It should be kept simple and very convenient.
There are different types of mobile app navigation. Some of them are:
- Hamburger Menu
- Tab Bar Menu
- Priority + Pattern
- Floating Action Button
- Full-Screen Navigation
- Gesture-Based Navigation
1. Hamburger Menu
Hamburger menus (or side drawers) are popular navigation patterns for mobile devices that help you save screen space. Using the drawer panel, you can hide the navigation beyond the left edge of the screen and reveal it only when the user taps on it.
Utilization
The major downside of a hamburger menu is its low discoverability, so it isn’t recommended as the primary navigation menu. A hamburger menu would be a better secondary navigation option. Secondary navigation options are destinations or features that are important for users only in specific circumstances.
Secondary utilities can be placed in less prominent visual locations as long as users can find them easily when they need them.
Pros
- A wide variety of navigation options: One significant advantage of this navigation menu is its ability to accommodate many navigation options in a small area.
Cons
- Undiscovered: You can’t remember what you don’t see; that’s human psychology. So although many mobile users are familiar with this type of navigation, they still don’t prefer to open it.
2. Tab Bar Menu
Tab bars are a go-to option for web applications. For example, the attached app contains relatively few destinations, which can be accessed directly from anywhere.
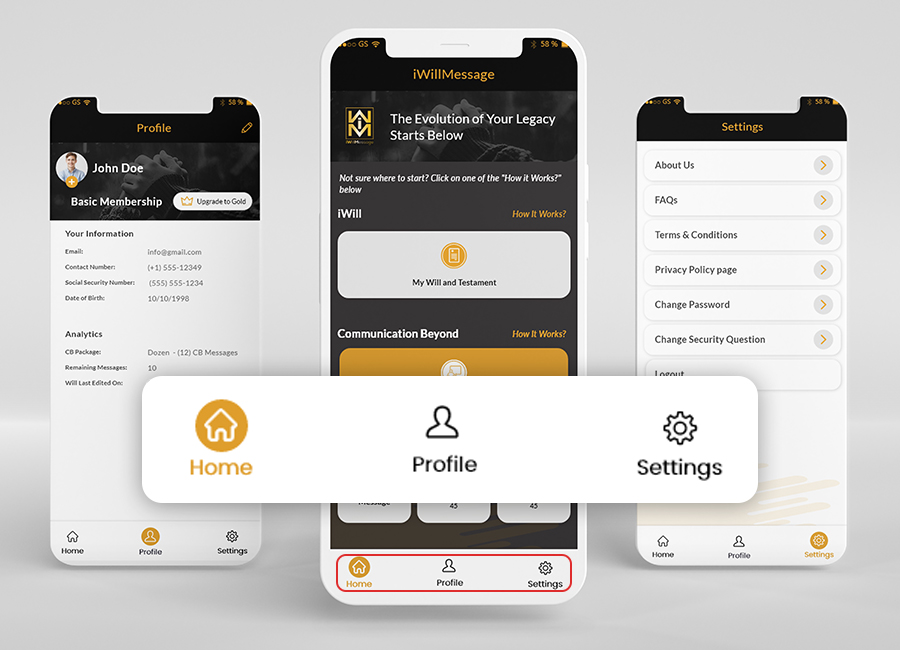
Utilization
Tab navigation is an excellent choice for apps with a limited number of top-level menu options (up to five). Through the tab bar, users have access to the most important features with just one tap.
Pros
- Properly used icons, labels, colors and the tab bar allow the user to understand their current location at a glance.
- No matter what page the user is on, the navigation remains visible. The user can see all the main app views and switch between them with a single tap.
- The thumb zone makes the bottom navigation easier to reach when the device is held in one hand.
Cons
You have limited navigation options. If you have more than five options, you might have trouble fitting them in a tab or navigation bar while maintaining optimum touch-target size.
3. Priority + Pattern
Putting less important items behind a “more” button is what Michael Scharnagl called the Priority + Pattern.

Utilization
The pattern might be a good solution if your app or website has tons of sections and pages (like a news site or a large retailer’s website).
Pros
- Navigation options can be prioritized in this pattern. Only the most frequent navigation options are displayed.
- This menu is very customizable. You can scale it in screen sizes quite well without having to transform the pattern.
Cons
- The Priority + Pattern requires designers to consider the relative importance of navigation elements. Keep in mind that the items you prioritize may not be the same items that users more often search for.
4. Floating Action Button:
The floating action button is shaped like a circled icon that hovers over the UI, changes color when focused, and stands out when selected. Known to all Android users, it is a distinctive element of material design.
Utilization
The floating action button is a circled button normally found under complaint or suggestion sections of an app denoted by a “+” sign. Its primary use case is to let a user write a complaint or suggestion to app owners. However, you can make it function differently according to the nature of your app.
Pros
- It is a guide to what is essential. This is a great way to prioritize the most important actions you want users to take.
- It takes up little space on the screen. Compared to the tab bar, it does not take up a full line.
Cons
- A floating action button sometimes distracts users from the actual content.
5. Full-Screen Navigation

While other patterns mentioned in this article would struggle to minimize the footprint of navigation systems, the full-screen pattern takes the exact opposite approach. This approach usually dedicates the home page exclusively to navigation. Users gradually tap or swipe to see additional menu options as they scroll up and down.
Utilization
The pattern works well with task and address-based websites and applications, especially when users stay within a single branch of the browsing hierarchy within a given session. Funneling users from broad overview pages to detail pages helps them find what they’re looking for and focus on the content in a single section.
Pros
- The full-screen navigation pattern is best for the sake of simplicity and consistency. You can organize and display a large amount of information consistently without overwhelming the user. Once the user has decided where to go, they can dedicate the entire screen area to content.
Cons
- When on browsers, this option goes miserably wrong. You can’t view any content other than the navigation options.
6. Gesture-Based Navigation

Gestures immediately became popular with designers, and many applications were developed to experiment with gesture controls. Today, the success of a mobile app is largely determined by how well the gestures are translated into the user experience.
Utilization
This pattern is good when users want to quickly and intuitively explore the details of certain content. Users spend more time on content than on navigation menus. So one of the reasons to use in-context gestures instead of a standard menu is because it’s more attractive. For instance, when users view the content of a page, they can touch a map to get more information.
Pros
- It eliminates clutter in the user interface. By putting gestures at the center of your design, you can make your user interfaces more minimalist and save screen space for valuable content.
- Gestures are a characteristic feature of a product. Tinder made a similar concept of gesture-based browsing massively popular, essentially turning that swipe into a product-defining gesture.
Cons
- Its biggest downside is that it multiplies user input. In addition, most gestures are not natural or easy to adopt or remember. When designing gesture-based navigation, keep in mind that every time you remove clutter from the user interface, the learning curve of the application increases. And without the proper visual cues, users could get confused about how to interact with the app.
You may:
🎚️Assign Priority Levels to Different Navigation Options
You must set navigational elements’ priority according to their functions.
You should assign a low, medium, or high priority to navigational elements based on users’ interaction with your app.
Simply put, you should structure information in a way that requires a minimum number of screens, swipes, and taps by the user.
Make sure to make each action and important feature visible so that users don’t have to stress their memory.
🍾 Focus On Making First-Time Experience Memorable
You must:
Avoid Asking for User Registration Info Upfront
Never ask for users to complete the registration process when they first open the app. Delay sign in as much as possible. The goal here is to let users get a feel of your mobile application. You could do this by giving them a tour of your app first.
This needs to be done because users often abandon the registration processes of apps they don’t recognize. Asking for information up-front might, in most cases, but the user off.
To avoid this, slowly remind the user of signing up as they navigate through the app.
✈️ Designing a Great Onboarding Experience Is a Must
Onboarding means showcasing the app’s value to your end-user when they begin using your mobile application. The goal here is to provide users with need-to-know information.
Among the many strategies used to offer a great onboarding experience, a famous one is “contextual” onboarding.
In contextual onboarding, you provide users with information only when the user needs to know it.
You can do this by:
- Asking only for the information your application visibly needs
- Never asking for information that isn’t necessary as it lowers your app’s credibility.
- Explaining the purpose of your information request. This will make your mobile app appear genuine.
When you explain the purpose of your information request, it makes the user aware of your goal. You can do this by designing a custom alert when requesting information.
Remember, delivering a wonderful onboarding experience is the basis of holding on to your users!
Your App Should Feel Seamless and Responsive
This should be a priority when it comes to delivering a great User Experience (UX)
Did you know? The ideal page load time must be less than 2 seconds! This is what almost 1 in every 2 users expect today. If your app page load time goes up to **[3 seconds] **, your bounce rate will go up by 32%
🚧 Distract Your Users Visually
It’s impossible to eliminate your load time completely. The least your app can do is make the wait more pleasant.
You can do this by providing your users with an animated waiting indicator.
Here’s a list of the 10 best loading indicators by Nick Babich. Check this out to get some great ideas.
The goal here is to retain users’ attention while waiting for your app to load its elements.
💀 Skeleton Screens Are a Must have
Skeleton Screens go a long way in giving users the perception that your mobile application is highly responsive and seamless.
They are rectangular patterns that appear before an app page is loaded, giving the impression that the app is speedy.
👍 Design for the Thumb Zone
Your app must make tapping easy for the users’ fingertips. You can do this by utilizing the standard thumb zone on a mobile phone screen.
You see, it’s all about how users hold their cellphones and how they tap. The majority of the users hold their phones with only one hand (chances are that you are too)
When you hold your phone in one hand, only a part of the screen can naturally be tapped by your thumb, hence the natural thumb zone!
5️ Mobile App Design Trends
It’s only been 29 years since the first smartphone hit the market, and we’re already seeing mobile app trends bounce back! While some apps are busy giving retro throwbacks to the ’90s, others keep one eye on the future.
As you’ve undoubtedly experienced, mobile app designs are way more elegant, responsive, and cleaner than ever before. This is all down to the rapid advances in our tech specs!
So why not get a head start yourself? Here’s a list of the coolest design trends you must be aware of in 2021
🖼️ Prioritize Utilizing Illustrations
Illustrations are going to be the new big in 2021! Say goodbye to bombarding users with plain boring text; instead, guide them through the app with images that complement your information.
Check out these 24 creative illustration ideas By Renee Fleck for better understanding.
Illustrations make the app feel more organic compared to meaningless images or graphics. Such illustrations make users feel at ease and the app environment cozy.
The purpose of this trend is to keep users interested, while the app reveals relevant information.
🌈 Use Colors of the Future
Among some of the top app design trends in 2021 is the use of futuristic colors. Before, apps used to focus more on adding natural colors such as shades of red, brown, green, etc.
Nowadays, they focus more on colors that feel futuristic such as shades of purple and blue. Such colors aren’t natural and rather, they are the result of a designer’s creativity.
These sorts of colors tend to stand out over dark backdrops and give out a neon-like digital vibe.
Here’s another reason for using such color pallets. Did you know that today’s smartphones show off bold and bright colors with more depth? So go ahead and let your inner Picasso shine!
🖥️Add Transparent Elements to UI
One thing that’s likely to change in 2021 are Transparency elements in a UI.
Remember, gradients, color pops, and overlays are making the shift towards being transparent, almost glass-like. When users can somewhat see through an image, it gives the impression of it being light-weight.
Making certain app elements such as gradients translucent make it convenient for more information to fit in less space. This also enables app elements to stand out and appear more defined while reducing clutter.
Here are some transparency ideas for your app interface that you may incorporate in your mobile app design.
🔦 Shed Light on the Dark Mode
Nowadays, more and more designers are shifting their focus towards Dark mode. It’s because people are increasingly spending more time on their smartphones.
App designers are aware of this, and they are developing mobile apps accordingly. This offers two benefits for the user:
- When users view apps in dark mode, it does not strain their eyes as much
- The phone’s battery life increases
To utilize dark mode efficiently, your text color should be kept light against a dark backdrop. This eases convenience for the user while they use the app.
🏙️ Utilizing 3D Elements
Adding 3D elements to mobile application design was quite trendy in 2020 and likely to continue in 2021.
Utilizing 3D elements can provide an immersive experience to the user. Full 3D imaging on a phone screen can give the users an illusion of having extra space they can access.
Using unique and sophisticated 3D elements can make even the most basic app pages look stunning.
Check out these examples of smartly utilizing 3D elements in UI Design to grasp this topic better.
Concluding Remarks
Ultimately, Mobile Application Design combines good visual appeal with great functionality. When these two elements are carefully worked upon, it should result in a brilliantly designed app.
It should be your aim when you take the plunge in mobile app design. Don’t forget to lower your expectations too!
It’s quite unrealistic to expect a perfectly designed app on the first attempt. Always remember, it’s a continuous process.
Your mobile application will continue to evolve as you gain feedback. Testing further and learning from mistakes will eventually perfect the user experience.
Good luck!
P.S Want to develop your own mobile application? At TechNerds, we have a fantastic team of mobile developers committed to making your app idea shine! Contact us for a quick quote.